


Оценок - 3, средний балл: 4.3
(

 )
)
|
Фото и характеристики Panasonic NV-VZ1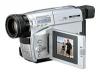 |


Фрагмент инструкции
n" • (-»26) 4 № [CAMERA/OFF/VCR] dfJHISgfi [OFF] ° 5 m [<] BATTERY EJECT] ttS®ife ° ENGLISH Attaching the Charged Battery 1 Insert the Battery with its top (so that the arrow points upward) into the top Battery Holder. 2 Press the bottom of the Battery toward the Movie Camera until it locks with a click. 3 Set the [CAMERA/OFF/VCR] Switch to [CAMERA] or [VCR]. • Turn the switch while pressing the button Q. • The Remaining Battery Operation Time can be confirmed both in the Finder and on the LCD Monitor • To ensure more precise indication of the remaining battery power, attach a fully charged Battery • For details about the Remaining Battery Power Indication, read “Checking the Remaining Battery Power. (-+ 26) ■ Removing the Battery 4 Set the [CAMERA/OFF/VCR] Switch to [OFF], 5 Hold the Battery firmly to prevent it from dropping and pull it off while sliding the [
Видеокамеры - NV-VZ1EN (7.11 mb)
Видеокамеры - NV-VZ1ENC (7.11 mb)
Видеокамеры - NV-VZ1ENH (7.11 mb)