


Оценок - 1, средний балл: 5
(
 )
)
)
|
Фото и характеристики Canon ZR930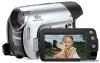 |


Фрагмент инструкции
FUNC. FUNC. Preparations First Time Settings Changing the Language The language for on-screen and menu displays can be changed. The list of available languages depends on the region where you purchased the camcorder. .. Default value Language Set A German, English.., Spanish, French, Italian, Polish, Russian, Simplified Chinese and Japanese. Language Set B English.., Simplified Chinese, Traditional Chinese and Korean. [ MENU] [ Y SETUP/ ] [LANGUAGE] Desired language NOTES FUNC. ( 22) FUNC. FUNC. • If you changed the language by mistake, follow the mark next to the menu item to change the setting. • The display that appears in some menu screens refers to the name of the button on the camcorder and will not change, regardless of the language selected. Changing the Time Zone Change the time zone to match your location. The default setting is New York or Singapore, depending on the region of purchase. FUNC. ( 22) [ ENU] [ IME SETUP] [T.ZONE/DST] Desir d time FUNC. * To adjust for daylight saving time, select the time zone with the mark next to the area. World Time Zones Once you have set the time zone, date and time, you do not need to reset the clock every time you travel to another time zone. Select the time zone to match the local time at your destination, referring to the date and time displayed on the screen. 90° 180° Setting the Date and Time FUNC. ( 22) 1 Open the date and time setup screen. Getting Ready to Start Recording Opening the Lens Cover and Adjusting the LCD Screen Before you start recording, open the lens cover. [ [DATE/TIME] Blinking arrows will be displayed MENU] FUNC. around the first field of the date. 2 Change each field of the date and time with the joystick ( ) and move ( ) to the next field. 3 Press ( ) to start the clock. 4 Press FUNC. to close the menu. Move the lens cover switch down to NOTES You can also change the date format ( 61). to open the lens cover. Rotating the LCD Panel Open the LCD panel 90 degrees. You can rotate the panel 90 degrees downward. You can rotate the panel 180 degrees toward the lens (allowing the subject to monitor the LCD screen while you use the viewfinder). This is the only case where you can use the viewfinder and 25 FUNC. FUNC. FUNC. Preparations the LCD screen simultaneously. Rotating the LCD panel 180 degrees can be useful in the following cases: • When you wish to include yourself in the picture when recording with the self timer. • To allow the camcorder to be operated with the wireless controller from the front. Subject can monitor the LCD screen NOTES About the LCD and viewfinder screen: The screens are produced using extremely high-precision manufacturing techniques, with more than 99.99% of the pixels operating to specification. Less than 0.01% of the pixels may occasionally misfire or appear as black, red, blue or green dots. This has no effect on the recorded image and does not constitute a malfunction. LCD Backlight You can set the brightness of the LCD screen to normal or bright. FUNC. ( 22) [ ENU] [ Y SETUP/ ] [BACKLIGHT] NOTES • This setting does not affect the brightness of the recording or the viewfinder screen. • Using the [BRIGHT] setting will shorten the effective usage time of the battery pack. Inserting and Removing a Tape Use only videocassettes marked with the logo. 1 Slide fully in the direction of the arrow and open the cassette compartment cover. OPEN/EJECT The cassette compartment opens automatically. 2 Insert the cassette. • Insert the cassette with the window facing the grip belt. • To remove a cassette pull it straight out. 3 Press the mark on the cassette compartment until it clicks. 4 Wait for the cassette compartment to retract automatically and close the cassette compartment cover. IMPORTANT • Do not interfere with the cassette compartment while it is opening or closing automatically, or attempt to close the cover before the cassette compartment has fully retracted. • Be careful not to get your fingers caught in the cassette compartment cover. NOTES If the camcorder is connected to a power source, cassettes can be inserted/ removed even if the switch is set to . Start/Stop Start/Stop Start/Stop Video This chapter covers functions related to shooting and playing back movies – from basic recording and zooming to more advanced manual picture adjustments. 1 Move the lens cover switch down Basic Recording to to open the lens cover. 2 Holding the lock button pressed down, set the switch to CAMERA. Shooting Video 3 Press to begin recording. Press again to pause the Before You Begin Recording Make a test recording first to check if the camcorder operates correctly. If WHEN YOU HAVE FINISHED RECORDING necessary, clean the video heads ( 2). 1 Close the lens cover and the LCD panel. 2 Turn off the camcorder. 3 Remove the tape. 4 Disconnect the power source and remove the battery pack. recording. ( 21) 28 NOTES IMPORTANT When recording movies, try to get a calm, stable picture. Excessive camcorder movement while shooting and exten...
Эта инструкция также подходит к моделям:Видеокамеры - ZR900 (3.17 mb)