


Оценок - 4, средний балл: 4.3
(

 )
)
|
Фото и характеристики Roland HP-203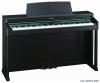 |


Фрагмент инструкции
A: Side Board (left) 1: Screw “a” (M5 x 40 mm) x4 B: Side Board (right) 2: Screw “b” (M5 x 20 mm) x6 C: Pedal Board D: Rear Board ¦ Assembly Procedure * Fasten each screw tightly, then place the stand in a stable and horizontal place. Also, carry out assembly of the instrument on an even surface. * Do not allow the pedal cord or power cable to get twisted or pinched while assembling the stand. * Do not set up the instrument on long-piled carpeting. This can cause instability in the stand and unsteadiness in the pedals, possibly resulting in damage to the unit. * Lay a soft cloth or similar material on the floor, and assemble the stand atop this surface. * When tightening the screws, turn them two or three revolutions by hand before using a screwdriver. Stand Assembly 1. Attach the side boards for the right and left sides to the pedal board (so that the metal parts face inside) using screws “a” (M5 x 40 mm). * When attaching the pedalboard, do not allow any gap to remain between the side board and pedalboard when the pieces are assembled. 2. Loosen the screws attached to the left and right side boards approximately three turns, so that they protrude about 3mm, as shown in the illustration. 3. Hook the metal brackets of the rear board over the screws you loosened (c), as shown in the illustration. 4. Use four screws “b” (M5 x 20mm) to provisionally fasten the pedal board. 5. Securely tighten the two side board screws and four pedal board screws. - Make sure that another person is on hand to help with the assembly and setup. - Be very careful, when you assemble and move the piano, to make sure that you do not drop it on your hands or feet. - To move the piano, lift it carefully—all the while keeping it level. - Be sure to keep any screws, caps, and other small components out of the reach of small children so as to prevent any child from accidentally swallowing these items. - Do not use a power tool (e.g., an electric screwdriver) to assemble the stand. You risk damaging or stripping the screws. KSC-40/42 STAND ASSEMBLY Copyright © 2007 ROLAND CORPORATION All rights reserved. No part of this publication may be reproduced in any form without the written permission of ROLAND CORPORATION. KSC-42 At first, assemble the entire stand in a temporary fashion, without really tightening the screws. Then, after checking the overall alignment of the boards (and gently shifting certain parts where necessary), go around and tightly fasten each of the screws. 1 Screw “a” 2pcs Screw “a” 2pcs .. .. Correct Improper Side board Side board Space Pedal Pedal board board 2 When attaching the rear board, before tightening the screws, adjust things as necessary at all the points where there are screws so as to assure that the rear board is aligned in parallel with the pedal board. 3 4, 5 5 Screws you loosened in step 2 (2 screws) Screw “b” (4 pieces) Rear view 2 Installing the Piano on the Stand 6. Align the protruding screws (one each at right and left) on the bottom of the piano with the openings in the metal fittings on the side board, then slide the piano forward until the screws are held in place. * When handling the piano, firmly grasp it. Be careful, so you do not get your fingers pinched. 7. Fasten the piano to the stand with the screw “b” (M5 x 20mm). Connecting the Pedal and Power Cords 8. Connect the pedal cord to the Pedal connector. 9. Connect the power cord to the AC Inlet on the piano, then plug the other end into AC Outlet. 10. Secure the pedal cord and power cord in place with the coated clip at the lower rear of the piano. Adjusting the Adjuster 11. Lower the adjuster at the bottom of the pedal board (by rotating it), so that the adjuster touches the floor. If you have the piano placed on a carpet, lower it until it pushes into the carpet. When Moving the Piano Disconnect the power cord , cables, and raise the stand’s adjuster. Then lift the piano while keeping it level, and move it with care, so that you do not drop it on your feet, or get your hands caught. 6 7 Screw “b” Please don’t get your fingers pinched. 8 9 Coated clip 11 Adjuster 3 ¦ Lieferumfang Uberprufen Sie vor dem Zusammenbau, ob Sie folgende Dinge bekommen haben. Zusatzlich benotigen Sie einen Kreuzschlitzschraubenzieher. A: Linke Seitenplatte 1: Schraube “a” (M5 x 40mm) x4 B: Rechte Seitenplatte 2: Schraube “b” (M5 x 20mm) x6 C: Pedaleinheit D: Ruckwand ¦ Zusammenbau * Ziehen Sie alle Schrauben fest an und stellen Sie die Standereinheit auf einen waagerechten Untergrund. Auch die Befestigung des Instruments muss auf einer ebenen Oberflache erfolgen. * Vermeiden Sie beim Zusammenbau das Abklemmen oder Quetschen des Pedalund Netzkabels. * Stellen Sie das Instrument niemals auf einen besonders dicken Teppich. Sonst fangt der Stander namlich an zu wackeln, was zu Schaden am Gestell und eventuell am Instrument fuhrt. * Am besten legen Sie die Einzelteile auf ein Laken o.a., um Kratzer beim Zusammenbau zu vermeiden. * Drehen Sie die Schrauben erst zwei oder...