


Оценок - 2, средний балл: 4
(

 )
)
|
Фото и характеристики Royal Sovereign RSS-1050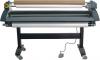 |


Фрагмент инструкции
4.Speed can be varied 1 or 2 by selecting button. 5.You release the machine from cold mode by pressing button. 6.Everytime you press the button, buzzer is ringing 7.ST/BY mode is not working at COLD mode. ***Check current temperature on the shoes.*** ***Cold mode*** SPEED COLD MEMORY ST/BY T-CHECK ST/BY T-CHECK C/HOT T-CHECK MEMORY SPEED C/HOT MEMORY - 16 - on the screen and STND-BY mode is set at 80.. 2. When machine is in mode, machine condition wouldn’t work. Press the button and it will revert to the previous working. 3. When the machine runs, you can’t change it to the the machine to the mode. 1. When press button the present numbers of length and papers laminated will be shown on the screen. 2. When you want to return to working mode, Press button again. 3.Also, you can reset measure mode by pressing button.(for 2 second) mode. In this case, press the button and turn ***Check the laminating length & How many laminated papers*** ***STND-BY (Saving Electricity while you are not operating for a while)*** 1. When press button will display ST/BY STOP BY ST/BY ST/BY RESET FAN MEANS MEANS MEANS RESET - 17 - LAMINATING STEPS 1. HOT LAMINATING 1. Properly plug in the machine. 2. Set up your film. 3. Turn on the power switch on the backside of the product. (Emergency Switch must be turned to the "OFF" position. 4. Set pressure lever to "Laminating" position. 5. Increase temperature of the hot shoe. If the temperature is memorized for the laminator, please push button, then useMEMORY button to choose the correct location. and the buzzer rings sound 6. It is ready when the LCD window shows three times. (It takes about 10minutes depending on setting temperature.) 7. To set the film tension properly, please use the Tension Adjustment Knob while you are checking laminating condition (The lower film tension would make the better operation.) 8. Set documents on the table. (You should allow at least 5mm(1/4") room on each on the control panel. If the rollers don't run, please check 9.Push side for perfect laminations. RUN the emergency switch whether it is located at "ON" position or not. 10. Push document into the rollers and start laminating. when the laminating is finished. Cut the document with the cross 11. Push cutter, if needed. STOP 12. It would be convenient, if the table guide is set at the proper position when the machine is continuously laminating. It is possible to cut unnecessary excess from the left/right side of the object with the Slitters. 13. The document, which has been just laminated, is pretty hot and easily bent. Try not to touch the document until it has cooled down. 14. After finishing your work(laminating), change the position of the Pressure Lever to "Hard Board, 1mm(40mil)". 15. Turn the Power switch off. - 18 ***Useful Information*** of to the front with buzzer sound. REV 1. It would be easier for you to operate the machine next time if the tempreature and the speed are set at the best condition and memorized by using the button MEMORY 2. sign may appear on LCD window in the case continuous laminating. If it happens, the speed needs to be lowered by one speed level and started again after signal on the LCD window. 3. In case of wrinkling or rolling of film due to wrong position of document, the button is needed to be keeping pushed in order that document could come out 4. When document is much smaller than film, you should place it in the middle of film for preventing wrinkle. 5. Use cooling fan when you laminate continuously without break and document is too hot. ***Laminating Speed at each level*** SPEED 1 1.0m(3.3ft) SPEED 2 1.6m(5.2ft) SPEED 3 2.0m(6.6ft) SPEED 4 2.2m(7.2ft) SPEED 5 2.6m(8.5ft) SPEED 6 3.3m(10.8ft) SPEED 7 4.3m(14.1ft) SPEED 8 5.2m(17.1ft) SPEED 9 6.0m(19.7ft) The above laminating speed numbers are at the condition on regular voltage with almost no film tension. There might be the possibility for difference to the above numbers due to the change of voltage or adjustment of tension. - 19 ***Temperature/Speed adjustment guide*** NO Film Thickness Paper Thickness Preset User's Guidence Remarks Temp Speed Storage Temp Speed 1 38 micron (1.5 mil) 100g/. 130 9 150g/. 130 7 1 300g/. 130 5 2 80 micron (3 mil) 100g/. 110 3 150g/. 110 3 2 300g/. 110 2 3 100micron (4 mil) 100g/. 110 2 150g/. 110 2 3 300g/. 110 2 4 125micron (5 mil) 100g/. 115 3 150g/. 115 3 4 300g/. 115 2 5 150micron (6 mil) 100g/. 120 3 150g/. 120 3 5 300g/. 120 3 6 175micron (7 mil) 100g/. 120 3 150g/. 120 2 6 300g/. 120 1 7 200micron (8 mil) 100g/. 130 1 150g/. 130 1 7 300g/. 130 1 8 250micron (10 mil) 100g/. 130 1 150g/. 130 1 8 300g/. 130 1 *NOTE IF the surrounding conditions are different, the adjustment is necessary to be controlled a lttle. - 20 + 7. Set document on the table. You should allow at least 5mm(1/4”) space on each side for perfect laminations 8. Turn the switch “Run” and "take up motor" at the same time. The liner and film wii be 11. Turn off the power switch. 2. Pull COLD film, and fix it so t...
Эта инструкция также подходит к моделям:Ламинаторы - RSS-1200 (1.18 mb)
Ламинаторы - RSS-685 (1.18 mb)