


Оценок - 4, средний балл: 3.5
(


 )
)
|
Фото и характеристики Sony HDR-CX115E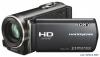 |


К этому устройству также есть другие инструкции:
Фрагмент инструкции
[Show others] . [ SCENARIO ERASE] (under [EDIT] category) . [ERASE] and select a scenario you want to erase with / , then touch . [YES] . . . . To erase all scenarios, touch (MENU) . [Show others] . [ SCENARIO ERASE] (under [EDIT] category) . [ERASE ALL] . [YES] . [YES] . . . . You can erase also by touching (OPTION) during Highlight Scenario Playback or on the scenario selection screen. To change music files (HDR-CX110E/ CX150E/XR150E) . You can transfer music files from audio CDs or MP3 files to your camcorder, and play them with Highlight Playback. To transfer music files, you need to install the supplied software “PMB” on your computer. Turn on your camcorder and computer, connect them with the supplied USB cable, then touch [DOWNLOAD MUSIC] on the camcorder screen. (If the [USB SELECT] screen does not appear, touch (MENU) . [Show others] . [MUSIC TOOL] (under [OTHERS] category) . [DOWNLOAD MUSIC]). . After the music file is transferred to the camcorder, if you cannot play the music, the music file may be damaged. Delete the music file by touching (MENU) . [Show others] . [MUSIC TOOL] (under [OTHERS] category) . [EMPTY MUSIC], then transfer the music file again. If you delete music files using [EMPTY MUSIC], the music data recorded on your camcorder at the factory will be deleted too. In this case, you can restore them using Music Transfer, a software installed together with “PMB.” To start Music Transfer, click [Start] . [All Programs] . [PMB] . [PMB Launcher] . [Export] . [Music Transfer]. For operating instructions, see [Music Transfer] help. Using PB zoom with photos You can magnify photos from about 1.1 to 5 times the original size. Magnification can be adjusted with the power zoom lever. . Play back the photo you want to magnify. . Magnify the photo with T (Telephoto). The screen is framed. . Touch the screen at the point you want to display in the center of the displayed frame. The point where you touched on the screen is moved to the center of the display frame. . Adjust the magnification with W (Wide angle)/T (Telephoto). To cancel, touch . 35 GB Recording/ Playing back a series of photos (Slide show) Playing back a series of photos (Slide show) on the photo playback screen. The slide show begins from the selected photo. To stop the slide show Touch . To restart the slide show Touch again. Notes You cannot operate playback zoom during slide show. . . Tips You can set continuous slide show playback by selecting (OPTION) . tab . [SLIDE SHOW SET] while playing photos. The default setting is [ON] (continuous playback). . . GB 3 Playing images on a TV Connection methods and the image quality (high definition (HD) or standard definition (STD)) viewed on the TV screen differ depending on what type of TV is connected, and the connectors used. . Touch / to select the input jack of your TV, then touch . . The connection medhod is displayed. . If you touch [HINT], you can see tips for the connection or change the settings of Recording/Connecting a TV using [TV CONNECT Guide] You can connect your camcorder to the TV easily following the instructions displayed on the LCD screen, [TV CONNECT Guide]. .Switch the input on the TV to the connected jack. Refer to the instruction manuals of the TV. .Turn on your camcorder, and touch (MENU) . [Show others] . [TV CONNECT Guide] (under [OTHERS] category) on the LCD screen. Use the supplied AC Adaptor as the power source (p. 14). .Touch [High Definition TV]. . . your camcorder. .Connect your camcorder to the TV. * HDR-CX110E/CX115E/CX116E/CX150E/ CX155E ** HDR-XR150E/XR155E HDMI OUT jack A/V Remote Connector ** * Connectors on your camcorder Input connectors on the TV GB 3 . . . When the A/V connecting cable is used to output movies, movies are output with standard definition image quality (STD). . Play back movies and photos on your camcorder (p. 29). Types of connection cables between your camcorder and TV Connecting to a high definition TV Component A/V Cable (supplied) (Green) Y (Blue)PB/CB (Red)PR/CR (White) (Red) HDMI Cable (sold separately) Connecting to a non-high-definition 1 :9 (wide) or 4:3 TV Component A/V Cable (supplied) (Green) Y (Blue)PB/CB (Red)PR/CR (White) (Red) A/V connecting cable with S VIDEO (sold separately) (White) (Red) (Yellow) A/V connecting cable (supplied) (Yellow) (White) (Red) When connecting to your TV via a VCR . Connect your camcorder to the LINE IN input on the VCR using the A/V connecting cable. Set the input selector on the VCR to LINE (VIDEO 1, VIDEO 2, etc.). To set the aspect ratio according to the connected TV (16:9/4:3) . Set [TV TYPE] to [16:9] or [4:3] according to your TV (p. 77). When your TV is monaural (When your TV has only one audio input jack) . Connect the yellow plug of the A/V connecting cable to the video input jack and connect the white (left channel) or red (right channel) plug to the audio input jack of your TV or VCR. When you connect with component A/V cable . If you connect only component video plugs, audio...
Эта инструкция также подходит к моделям:Видеокамеры - HDR-CX110E (2.21 mb)
Видеокамеры - HDR-CX116E (2.21 mb)
Видеокамеры - HDR-CX150E (2.21 mb)
Видеокамеры - HDR-CX155E (2.21 mb)