


Оценок - 5, средний балл: 4.2
(

 )
)
|
Фото и характеристики Canon MVX300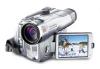 |


К этому устройству также есть другие инструкции:
Фрагмент инструкции
Direct Printing 2. Make sure that (PAPER) is selected and press the SET dial. 125 3. Turn the SET dial to select the paper size and press the SET dial. • Select the paper size of the paper set in your printer. • Pressing the MENU button brings you back to the print settings menu. 4. Turn the SET dial to select (BORDERS) and press the SET dial. 5. Turn the SET dial to select a borders option and press the SET dial. Pressing the MENU button brings you back to the print settings menu. Setting the Print Style IMAGE STANDARD Prints 1 still image per page. MULTIPLE Prints 8 copies of the same still image on one page. BORDERS BORDERLESS Prints right to the edges of the page. BORDERED Prints with a border. • [BORDERED]: The image area remains relatively unchanged from the recorded image when it is printed. [BORDERLESS]/[MULTIPLE]: The center portion of the recorded image is printed at an enlarged size. The image’s top, bottom and sides may be cropped slightly. • [MULTIPLE] can only be selected when printing on card size paper. • [BORDERS] can only be selected when [IMAGE] is set to [STANDARD]. 1. In the print setting menu, turn the SET dial to select [STYLE] and press the SET dial. Selecting the Image Style 2. Make sure that (IMAGE) is selected and press the SET dial. E 3. Turn the SET dial to select the image style and press the SET dial. Pressing the MENU button brings you back to the print settings menu. Selecting the Borders 2. Turn the SET dial to select (BORDERS) and press the SET dial. 3. Turn the SET dial to select a borders option and press the SET dial. Pressing the MENU button brings you back to the print settings menu. Direct Printing 127 Trimming Settings Set the print style before you start with the trimming settings. 1. In the print setting menu, turn the SET dial to select [TRIMMING] and press the SET dial. The trimming frame appears. 2. Change the size of the trimming frame. • Move the zoom lever toward T to shrink the frame, and toward W to enlarge the frame. • To cancel the trimming settings, move the zoom lever toward W until the trimming frame disappears. 3. Move the trimming frame. • Turn the SET dial to move the frame. Press the SET dial to switch between the directions (up/down or right/left). • Pressing the MENU button brings you back to the print settings menu. • About the color of the trimming frame (Canon CP-Printers only): -White: No trimming settings. -Green: Recommended trimming size. (The trimming frame may not appear in green depending on the image size, paper size or borders settings.) -Red: The image is magnified beyond recommended size. The image will be printed coarsely. • The trimming setting applies only to one image. • The trimming setting is canceled with the following operations: -When you turn off the camcorder. -When you disconnect the interface cable. -When you expand the trimming frame beyond its maximum size. Printing with Print Order Settings E You can select still images for printing and set the number of copies. These print order settings are compatible with the Digital Print Order Format (DPOF) standards and can be used for printing on DPOF compatible printers ( 119). A maximum of 200 still images can be selected. Selecting Still Images for Printing (Print Order) Do not connect a USB or DV cable to the camcorder while setting the print orders. CAMERA PLAY (VCR) CARD CAMERA CARD PLAY 1. Select the still image you wish to print. 2. Press the SET dial to open the FILE OPER. menu. 3. Select [ PRINT ORDR]. 4. Select the number of copies. •“ ” appears on the image. • To cancel the print order, set the number of copies to 0. 5. Select [ RETURN] to close the menu. Selecting in Index Screen Display CAMERA PLAY (VCR) CARD CAMERA CARD PLAY MENU CARD OPERATIONS PRINT ORDER ( 37) 1. Move the zoom lever toward W. • Up to 6 images appear. • Select the image you wish to print. 2. Open the menu and select [CARD OPERATIONS]. Select [ PRINT ORDER]. 3. Press the SET dial and set the number of copies with the SET dial. •“ ” appears on the image. • To cancel the print order, set the number of copies to 0. 4. Close the menu. Direct Printing 129 Erasing All Print Orders CAMERA PLAY (VCR) CARD CAMERA CARD PLAY MENU CARD OPERATIONS PRINT ORDERS ALL ERASE ( 37) 1. Open the menu and select [CARD OPERATIONS]. 2. Select [ PRINT ORDERS ALL ERASE]. “ERASE ALL PRINT ORDERS?”, [NO] and [YES] appears. 3. Select [YES]. All “ ” disappear. 4. Close the menu. Printing CAMERA PLAY (VCR) CARD CAMERA CARD PLAY MENU PRINT ( 37) 1. Connect the printer to the camcorder ( 119). 2. Open the menu and select [ PRINT]. • The print setting menu appears. • “SET PRINT ORDER” appears, when you connect a printer with direct print function and select [ PRINT] without having set the print order. 3. Make sure that [PRINT] is selected and press the SET dial. Printing starts. The print setting menu disappears when printing is complete. • Depending on the connected printer, you can select style or paper settings before step ...
Эта инструкция также подходит к моделям:Видеокамеры - MVX350i (4.56 mb)
Видеокамеры - MVX330i (4.56 mb)