


Оценок - 5, средний балл: 4.2
(

 )
)
|
Фото и характеристики Casio LK-215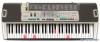 |


Фрагмент инструкции
1 Press the SCORING button. • This causes the SCORING indicator to appear on the display. • A count beat sounds and then evaluation mode starts. Indicator appears 2 Play in accordance with the guidance on the monitor screen. • To stop evaluation, press the PLAY/STOP button. This displays only the points accumulated up to that point. 3 After you finished playing, your evaluation result appears on the display. • For information about evaluation ranks, see “Evaluation Results” on page E-24. • Pressing the SONG BANK button or PIANO BANK button returns to the tune selection screen. Bravo ! 3-Step Lesson Voice Fingering Guide Voice fingering guide uses a simulated human voice to call out fingering numbers during Step 1 and Step 2 one-hand part practice. If you need to press a key with your thumb, for example, voice fingering guide says, “One!” In the case of a chord to be played with your thumb, middle and little finger, voice fingering guide says, “One, three, five!” Voice Fingering Guide calls out fingerings only when you do not press the proper key when you should. Voice Fingering Guide One : Thumb Two : Forefinger Three : Middle finger Four : Ring finger Five : Little finger To turn voice fingering guide on or off Press the SPEAK button to toggle voice fingering guide on (voice fingering guide indicator displayed) and off (indicator not displayed). Indicator appears NOTE • Note that Voice Fingering is disabled in the Evaluation Mode. • Exiting the Evaluation Mode automatically restores the Voice Fingering setting that was in effect when you entered the Evaluation Mode. Using the Metronome The metronome feature of this keyboard produces a bell sound for the first beat of each measure, followed by click sounds for each successive beat of the measure. It is the perfect tool for practicing tunes without accompaniment (rhythm). To start the metronome 1 Press the METRONOME button to start sounding the metronome. • This causes “Beat” to appear on the display. Perform step 2 within five seconds after “Beat” appears. 2 Use the number buttons or [+] and [–] to change the number of beats per measure. • You can specify 0, or a value from 2 to 6 as the number of beats per measure. Be a t NOTE • The bell (indicating the first beat of a measure) does not sound while one beat per measure is specified. All beats are indicated by a click sound. This setting lets you practice with a steady beat, without worrying about how many beats there are in each measure. 3 Use the TEMPO buttons to set the tempo. • Press to increase the tempo (make if faster) or to decrease it (make it slower). Flash Tempo value NOTE • While the tempo value is flashing, you can also use the number buttons or [+] and [–] to input a three-digit value. Note that you must input leading zeros, so 90 is input as 090. • Pressing both the and TEMPO buttons at the same time automatically returns the currently selected rhythm or tune to its default tempo. 4 To turn off the metronome, press the METRONOME button. Auto Accompaniment Selecting a Rhythm This keyboard provides you with 120 exciting rhythms that you can select using the following procedure. To select a rhythm 1Find the rhythm you want to use in the RHYTHM List and note its rhythm number. • Not all of the available rhythms are shown on the rhythm list printed on the keyboard console. For a complete list, see the “Rhythm List” on page A-6. 2Press the RHYTHM button. 3Use the number buttons to input the three digit rhythm number for the rhythm you want to select. Example: To select “075 RHUMBA”, input 0, 7 and then 5. NOTE • You can also increment the displayed rhythm number by pressing [+] and decrement it by pressing [–]. • Some rhythms consist of chord accompaniments only, without any drums or other percussion instruments. Such rhythms do not sound unless CASIO CHORD or FINGERED is selected as the accompaniment mode. This keyboard automatically plays bass and chord parts in accordance with the chords you finger. The bass and chord parts are played using sounds and tones that are automatically selected to select the rhythm you are using. All of this means that you get full, realistic accompaniments for the melody notes you play with your right hand, creating the mood of an one-person ensemble. Rh u m b a Po p 1 Indicator appears Number buttons VARIATION/FILL-INNORMAL/FILL-IN INTRO SYNCHRO/ENDING [+] / [–] RHYTHMSTART/STOP POWER/MODE MAIN VOLUME Auto Accompaniment Playing a Rhythm Use the following procedure to start and stop rhythm play. T o play a rhythm 1 Set the POWER/MODE switch to NORMAL. 2 Press the START/STOP button to start play of the currently selected rhythm. 3 To stop rhythm play, press the START/STOP button again. NOTE • All of the keyboard keys are melody keys while the POWER/MODE switch is set to NORMAL. Using Auto Accompaniment The following procedure describes how to use the keyboard’s Auto Accompaniment feature. Before starting, you should first select the rhythm you want to use and set the ...
Эта инструкция также подходит к моделям:Музыкальные инструменты - LK-210 (2.84 mb)