


Оценок - 0, средний балл: 0
(
 )
)
|
Фото и характеристики NETGEAR WNA1100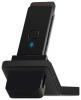 |


Фрагмент инструкции
if you insert the adapter again, the icon returns. NETGEAR Genie Home When you launch NETGEAR Genie, the home screen displays. This screen shows you at a glance if you are connected to a network, and if you have Internet access. The following options are available: • Select Language. If more than one language is available, you can select a language from this drop-down list. NETGEAR Genie screens will be displayed in the language that you selected. • Home button. The currently selected Home screen. You can click the Home button to return here from a different screen. • Join a Network button. View a list of wireless networks and join a network. • Other button. View more information or check for software updates. • Help. Display the help. Status Bar The status bar is located at the bottom of the screen: NetworkConnectionNetworkWirelessThroughputSignalsecuritychannelstrengthnamestatus Figure 2. Status bar Network name. The network name (SSID) of the wireless network that the adapter is currently connected to. Connection status. This shows the status that is also shown in the diagram in the middle of this screen. • Connected to the Internet • Connected to the Router • No Connection Network security. The lock symbol shows whether or not the network you are connected to uses wireless security. An open lock indicates an open network without wireless security, such as one that you might use in a coffee shop. Wireless channel. The wireless channel of the network that the adapter is connected to. Throughput. The throughput rate for wireless communication. Signal strength. The strength of the wireless signal. Three-to-five bars indicate a good signal. One or two bars indicate a weak signal. Join a Wireless Network In NETGEAR Genie, click the Join a Network button to display the following screen: Network list. View the wireless networks in the area. Click a network to select it. Manual Connect. Click this button to join a network without viewing it on the network list, or to connect to a hidden network. A hidden network does not broadcast its wireless network name (SSID). Refresh. Click this button to scan for available networks in the area. Network Details From the Join a Network screen, you can view more details about a specific network. 1. In the Join a Network screen, click the network to select it 2. Click the Details button to display a screen similar to the one shown here. The following information is displayed: • Network Name (SSID). The name assigned to a wireless network. Note that, as a security measure, some wireless access points do not broadcast their SSIDs. In such cases, the network is hidden. The name (SSID) field is blank even though the rest of the information is displayed. • Channel. The channel that the wireless network operates on. NETGEAR recommends that you choose a network that uses a channel that is different from that of neighboring networks. • Wireless Mode. The wireless technology used for this router such as n, g, or b. • WPS Support. Identifies whether the router or access point for this network supports WPS (Wi-Fi Protected Setup). • MAC Address. The unique hardware address of the wireless device broadcasting this information. Typically, this is a wireless router, gateway, or access point. Join a Network or Connect to a Different Network You can use WPS to join a wireless network if your wireless network supports it, or you can join a wireless network from this NETGEAR Genie screen. • WPS. Press and hold the WPS button on the side of the adapter for 2 seconds. Then within 2 minutes, press the WPS button on your wireless router or gateway. • NETGEAR Genie: Click your wireless network to select it from the list, and then click Connect. If the network is secure, enter its password or network key. After the adapter joins the network, it automatically saves the network connection information to a Windows profile. Windows profiles can be used by Genie and the Windows utility. The next time you launch NETGEAR Genie, it will automatically connect to the network you previously joined if there's no change in the network information. 1. Press and hold the WPS button on the side of the adapter for 2 seconds. 2. Then within 2 minutes, press the WPS button on your wireless router or gateway The adapter joins the network, which can take a few minutes. Your settings are saved in a profile. 1. From NETGEAR Genie, click Join a Network. 2. Look for your network in the list on this screen. If you do not see your network, you might need to scroll down to view more networks. If the network name is not displayed, that indicates a hidden network that does not broadcast its SSID. Use the manual method to connect to a hidden network. See Join a Hidden Network on page 12. 3. Click the network that you want to join. 4. Click the Connect button. 5. If the wireless network is secure, enter the network password. The adapter joins the wireless network. This could take a few minutes. Join a Hidden Network A hidden networ...