


Оценок - 5, средний балл: 4.2
(

 )
)
|
Фото и характеристики Oregon Scientific BAR332ES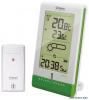 |


Фрагмент инструкции
2 Front View....................................................................... 2 Top View......................................................................... 3 Bottom View.................................................................... 3 Solar Panel...................................................................... 4 Remote Sensor............................................................... 4 Getting Started.................................................................. 4 Solar Panel...................................................................... 4 Backup Power................................................................. 6 Remote Sensor.................................................................. 6 Clock and Calendar.......................................................... 7 Clock Reception.............................................................. 7 Manually Set Clock.......................................................... 7 Alarm.................................................................................. 8 Temperature...................................................................... 8 Weather forecast............................................................... 8 Backlight............................................................................ 9 Reset.................................................................................. 9 Specifications.................................................................... 9 Precautions....................................................................... 9 About Oregon Scientific................................................. 10 EU-Declaration of Conformity........................................ 10 FCC Statement................................................................ 10 E N Eart h Friend ly The +ECO line embodies our commitment to environmental concerns. Aware of threats facing the world we live in, Oregon Scientific™ has combined technological know-how, practicality and style to create this line of environmentally friendly products. These products provide practical solutions while enabling you and us to fulfill our environmental responsibility. Simply detach the solar panel and face it directly towards the sun for a few hours to receive the amount of energy necessary to power the device. Together we can improve the world we live in. Over view Front View 1 10 11 12 13 14 15 16 2 3 4 5678 9 1. : Remote sensor reception indicator and outdoor channel selected 2. Outdoor temperature 3. Indoor temperature 4. Weather forecast 5. : Clock signal reception indicator 6. : Alarm time is displayed 7. : Daily alarm is On 8. AM / PM 9. Rechargeable battery status LED indicator 10. : Outdoor remote sensor battery low 11 . : Main unit back-up batteries low / no battery 12. : AC adaptor connected 13. : Rechargeable battery is low / solar panel detached 14. : Rechargeable battery level indicator 15. : Time zone offset 16. Calendar / Clock with weekday / seconds Top View 1 2 3 4 5 6 1. SNOOZE: Activate snooze alarm / backlight 2. / : Increase / decrease value of the setting; activate / deactivate clock reception signal 3. : Change display; set clock 4. : Toggle between outdoor temperature channels (1-3); initiate auto-toggle 5. : View alarm status; set alarm 6. : Activate / deactivate alarm function botom View 1 2 3 1. SEARCH: Initiate sensor search 2. RESET: Reset unit to default settings 3. °C / °F: Select temperature unit SOLAR PANEL 1 2 3 4 5 1. CHARGING: charging in process 2. FULL: batteries fully charged (when TEST is pressed) 3. Solar panel 4. TEST establish if battery is full 5. Battery compartment REMOTE SENSOR 1 2 3 4 5 1. LED status indicator 2. Wall mount hole 3. Battery compartment 4. RESET: Reset unit to default settings 5. CHANNEL switch GETTING STARTED Solar Pane l This product uses two AAA rechargeable batteries which should be charged via the solar panel. For the batteries’ first charge, it is strongly advised to charge it for at least 12 hours. To charge the battery: 1. Detach solar panel by exerting downward pressure and pulling at a 45° angle (approx.) away from main unit. 2. Insert 2 AAA rechargeable batteries in battery compartment located at the back of the solar panel. IMPORTANT Place ONLY NiMH type rechargeable batteries in the solar panel battery compartment. Do not charge non-rechargeable batteries. 3. Expose the solar panel directly to sunlight for approximately 5-6 hours to charge the battery. The (red) CHARGING LED on solar panel will light up indicating there is sunlight and unit is charging. TIP Press and hold TEST located at the back of the solar panel. (Green) FULL LED indicates batteries have been fully charged. 4. Align holes with protruding plastic. Push solar panel towards main unit and snap into place. 5-6 hours of battery charging will normally provide power to operate unit for 2 months. When the rechargeable battery is nearly flat or when solar panel has been detached,...
Эта инструкция также подходит к моделям:Регистраторы времени - BAR332ESU (2.12 mb)
Регистраторы времени - BAR332ESA (2.12 mb)