


Оценок - 5, средний балл: 3.6
(

 )
)
|
Фото и характеристики Canon LV-7585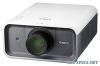 |


К этому устройству также есть другие инструкции:
Проекторы - LV-7585 (257.66 kb)
Проекторы - LV-7585 (404.49 kb)
Фрагмент инструкции
This projector utilizes built-in multimedia features, a palette of 1.07 billion colors, and matrix liquid crystal display (LCD) technology. . Functionally Rich This projector has many useful functions such as lens shifting, ceiling and rear projection, perpendicular omnidirectional projection, variety of lens options, etc. . Multi-use Remote Control Unit Use the remote control unit as wired and wireless, or as a PC wireless mouse. Eight remote control codes and selectable pointer shapes are also available. . Simple Computer System Setting The projector has the Multi-scan system to conform to almost all computer output signals quickly (p.34). Up to UXGA resolution can be accepted. . Useful Functions for Presentation Digital zoom function allows you to focus on the crucial information during a presentation (pp.14, 40). . Security Function The Security function helps you to ensure security of the projector. With the Key lock function, you can lock the operation on the side control or remote control unit (p.53). PIN code lock functions prevents unauthorized use of the projector (pp.53–54). . Lamp Mode Brightness of the projection lamp can be selected (p.51). . Automatic Filter Replacement Function The projector monitors the condition of the filter and replaces a filter automatically when it detects the clogging. . Power Management The Power management function reduces power consumption and maintains lamp life (p.52). . Multilanguage Menu Display Operation menu is available in 12 languages; English, German, French, Italian, Spanish, Portuguese, Dutch, Swedish, Russian, Chinese, Korean, and Japanese (p.48). . Network-capable Through an optional Network Imager, you can operate and control the projector. . Logo Function The Logo function allows you to customize the screen logo (pp.49–50). You can capture an image for the screen logo and use it for the starting-up display or between presentations. . Pointer Function Remote control pointer function. This function helps you to make a smart presentation on a projected screen. . Helpful Maintenance Functions Lamp and filter maintenance functions provide for better and proper maintenance of the projector. . Multiple Interface Terminals The projector has several interface terminals that can support various types of equipment and signals (p.11). . Motor-driven Lens Shift Projection lens can be moved up, down, right and left with the motor-driven lens shift function. This function makes it easy to provide projected image where you want. Zoom and focus can also be adjusted with a motor-driven operation. (p.27) .Note: • The On-Screen Menu and figures in this manual may differ slightly from the product. • The contents of this manual are subject to change without notice. Table of Contents Features and Design Table of Contents To The Owner 4 Safety Instructions Air Circulation 6 Installing the Projector in Proper Directions 7 Moving the Projector 8 Cautions in Handling the Projector 8 Compliance 9 Part Names and Functions Front 10 Back 10 Bottom 10 Rear Terminal 11 Side Control and Indicators 12 Remote Control Unit 13 Remote Control Battery Installation Remote Control Receivers and Operating Range 15 Wired Remote Control Transmitter 15 Remote Control Code 16 Installation 17 Positioning the Projector 17 Adjustable Feet 17 Lens Installation 18 Connecting to a Computer (Digital and Analog RGB) Connecting to Video Equipment (Video, S-Video) 21 Connecting the AC Power Cord 22 Basic Operation Turning On the Projector 23 Turning Off the Projector 24 How to Operate the On-Screen Menu Menu Bar 26 Operating with Projector Control 27 Operating with Remote Control Unit 28 Pointer Function Wireless Mouse Operation 30 Input Selection 1 Input 31 Computer Input Source Selection 32 Video Input Source Selection 33 Trademarks Computer Input 4 Computer System Selection 34 Auto PC Adjustment 35 Manual PC Adjustment 36 Image Level Selection 38 Screen Size Adjustment 39 Video Input 41 Video System Selection 41 Image Level Selection 42 Screen Size Adjustment 43 Picture Image 45 Image Adjustment 45 Setting 48 Setting 48 Maintenance and Care 56 Filter Instructions 56 Replacing the Filter Cartridge 57 Resetting the Filter Counter 58 Resetting the Scroll Counter 58 Lamp Replacement 59 Resetting the Lamp Counter 60 Cleaning the Projection Lens 62 Cleaning the Projector Cabinet 62 Warning Indicators 63 Appendix 64 Troubleshooting 64 Menu Tree 66 Indicators and Projector Condition 69 Compatible Computer Specifications 71 Technical Specifications 73 Optional Parts 74 Lens Replacement 74 PJ Link Notice 74 Configurations of Terminals 75 Dimensions 77 Serial Control Interface 78 Each name of corporations or products in this book is either a registered trademark or a trademark of its respective corporation. To The Owner Before installing and operating the projector, read this manual thoroughly. The projector provides many convenient features and functions. Operating the projector properly enables you to manage tho...