


Оценок - 3, средний балл: 3.7
(

 )
)
|
Фото и характеристики Sony NWZ-W252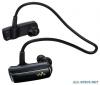 |


К этому устройству также есть другие инструкции:
Фрагмент инструкции
(backward) or . (forward). Move and hold the jog lever to skip to the beginning of the previous or next folder. Shuffle playback Press the SHUF(Shuffle)/PLAYLISTS button to play back songs in random order. During shuffle playback, you cannot skip to the previous or next folder, even if you move and hold the jog lever. Playing a playlist Press and hold the SHUF(Shuffle)/PLAYLISTS button to play a playlist. Move and hold the jog lever to . (backward) or . (forward) to skip to the beginning of the previous/next playlist. To return to playback of all the songs transferred to the player, press and hold the SHUF(Shuffle)/ PLAYLISTS button during playback of a playlist. Note When you play a playlist, only the songs registered in the playlist are played back repeatedly. To stop playback Press the jog lever upward. . What is ZAPPIN Playback? Checking Supplied Accessories • This player (1) • Stand with USB cable (1) Earbuds (Size S, L) (Supplied in pairs) Operation Guide (this manual) (1) •• Holder (1) Notes on Water Resistant Specifications (1) •• How to install the earbuds At purchase, M size earbuds are installed (S and L sizes are also supplied). To enjoy better sound quality, change the size of the earbuds or adjust the earbud position to fit in your ears comfortably and snugly. When you change the earbuds, twist while installing them firmly on the player to prevent the earbud from detaching and remaining in your ear. If an earbud becomes damaged, optional earbuds (EP-EX1) are available for purchase. How to store the player into the holder To prevent magnetic leakage, store the player in the supplied holder whenever carrying or when not using the player. The magnet is on the right side. Do not place credit cards or ATM cards, etc. (magnetic coded cards) near the player when it is not stored in the holder to prevent damage to the magnetic coding on the cards. Hold the player by the holder and close the holder until it clicks. Parts and Controls Neckband OPR (Operation) lamp SHUF(Shuffle)/ PLAYLISTS button Jog lever VOL+*/- button Status lamp USB jack cover RESET button * There is a tactile dot on the button. Use it to help with button operations. Headphone section How to place the player on your ears . Check the left (L) and right (R) parts of the player. . Separate the left and right parts. These parts are magnetically coupled. . Hang the neckband over the back of your neck and ears, and place the earbuds into your ears. 2 Preparing the Player Charging the player Upon purchase, first, charge the player. . Connect the player to a running computer using the stand. If a screen appears presenting a choice of actions, click “Cancel.” Charging starts. The status lamp blinks slowly during charging. When charging is completed, the status lamp will stop blinking and light dimly while the player is connected to the computer. For details about charging time and the battery duration, see . “Specifications” on the reverse side. Checking the remaining battery power Remaining battery power is indicated in the OPR lamp. When the OPR lamp changes to red, recharge the battery. Green* Red* Quick red Orange* blinking * Blinks at about 5 second intervals. When the battery is used up, the OPR lamp blinks red quickly and a long beep is heard. You cannot operate the player. 1 Importing and Transferring Music This section describes the procedures . from “Three Ways to Transfer Music” above. For details on the procedures . or ., see the reverse side. You can transfer songs to the player using Windows Media Player on your computer. Here we describe how to import and transfer songs using Windows Media Player 11. . Import songs from CDs, etc., to Windows Media Player on the computer. For details on how to import songs from CDs, etc., refer to the Help of Windows Media Player. You do not need to re-import songs that have previously been imported to Windows Media Player. 1 Click “Rip.” 2 Click here to start importing. . Connect the player to the computer by using the stand. . Transfer songs from Windows Media Player to the player. The status lamp blinks brightly while transferring songs to the player. 1 Choose albums, etc. 2 Click here to transfer to the player. . Hint See also . “Hint about transferring music” and “Notes about transferring music” on the reverse side. . 3 Playing Music . Hints When you press the jog lever upward or move it forward/backward after separating the left and right parts of the player, the player will turn on and start playback. If you want to skip to the previous/next song, move the jog lever after playback starts. After you press the jog lever, the OPR lamp blinks green and red alternately and the beep is heard repeatedly until the playback starts. Please wait until the OPR lamp blinking and the beeping stops. See also . “Hints about playing music” on the reverse side. . . . ZAPPIN playback The player plays back song clips for about 4 seconds each. If the most recognizable passage of the song cannot be found, the ...
Эта инструкция также подходит к моделям:Плееры - NWZ-W253 (827.46 kb)