


Оценок - 4, средний балл: 3.8
(

 )
)
|
Фото и характеристики Yamaha NS-P220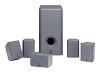 |


Фрагмент инструкции
To mount the rear speakers on a wall by using the provided mounting brackets (type B) Note It is recommended that you connect the speaker cords to the speaker’s terminals before attaching the bracket to the speaker. 1 Attach the bracket to the bottom of the speaker by using the provided screw (type B). 2 Turn and/or slide the speaker on the bracket according to your preference, and then, tighten the screw. 3 Fasten screws into a firm wall or wall support as shown in the figure, and hang the holes of the mounting bracket on the protruding screws. * Make sure that the screws are securely caught by the narrow parts of the holes. Note If desired, you can hang the speaker directly on the protruding screws on the wall without using the bracket. WARNING . Each speaker weighs 0.7 kg (1 lbs. 9 oz.). Do not mount them on thin plywood or a wall with soft surface material. If mounted, the screws may come out of the flimsy surface and the speakers may fall. This damages the speakers or causes personal injury. . Do not install the speakers to a wall with nails, adhesives, or any other unstable hardware. Long- term use and vibrations may cause them to fall. . To avoid accidents resulting from tripping over loose speaker cords, fix them to the wall. . Select a proper position on the wall to mount the speaker and the bracket so that no one will injure his/ her head or face with the edge of the bracket. E-5 SPEAKERS MAIN CENTER REAR (SURROUND) OUTPUT SUB WOOFER CAUTION SEE INSTRUCTION MANUAL FOR CORRECT SETTING. MAIN A B A B CENTER REAR (SURROUND) /MONO VOLUME INPUT1 FROM AMPLIFIER OUTPUT TO SPEAKERS INPUT2 AUTO STANDBY STANDBY-RED ON-GREEN OFF LOW HIGH OFF POWER ON 0 I0 INPUT2 /MONO REAR RREAR RCENTERCENTER FRONT R FRONT R FRONT L FRONT L Right Subwoofer To AC outlet SPEAKERS MAIN CENTER REAR (SURROUND) OUTPUT SUB WOOFER CAUTION SEE INSTRUCTION MANUAL FOR CORRECT SETTING. MAIN A B A B CENTER REAR (SURROUND) /MONO VOLUME INPUT1 FROM AMPLIFIER OUTPUT TO SPEAKERS INPUT2 AUTO STANDBY STANDBY-RED ON-GREEN OFF LOW HIGH OFF POWER ON 0 I0 INPUT2 /MONO REAR RREAR RCENTERCENTER FRONT R FRONT R FRONT L FRONT L Right Subwoofer To AC outlet CONNECTIONS Caution: Plug in the subwoofer and other audio/video components after all connections are completed. . An example of basic connections Center speaker Rear speakers Left REAR L REAR L Amplifier Right Left Main speakers English English . Connect the main, center and rear speakers to the speaker output terminals of your amplifier with the provided speaker cords. * The provided speaker cords have labels marked FRONT L, FRONT R, CENTER, REAR L or REAR R. Connect each speaker cord to the corresponding speaker by following the figure on page 6. * Connect each speaker making sure not to reverse the polarity (+, –). If the speaker is connected with reversed polarity, the sound will be unnatural and lack bass. * For the main and rear speakers only, connect one speaker to the left (marked L) terminals of your amplifier, and another speaker to the right (marked R) terminals. . Basically, connect the subwoofer to the line output (pin jack) terminal(s) of the amplifier. If your amplifier does not have any line output terminal, connect the subwoofer to the speaker output terminals of the amplifier. (Refer to page 9 for details.) * To connect with a YAMAHA DSP amplifier (or AV receiver), connect the SUBWOOFER (or LOW PASS etc.) terminal on the rear of the DSP amplifier (or AV receiver) to the L/MONO INPUT2 terminal of the subwoofer. * To connect the subwoofer to the SPLIT SUBWOOFER terminals on the rear of the DSP amplifier, connect them to both the left L and right R INPUT2 terminals of the subwoofer. Note When connecting to a monaural line output terminal of the amplifier, connect the L/MONO INPUT2 terminal. E-7 . How to connect speaker cords to the input and output terminals of the speakers For connections, keep the speaker cords as short as possible. Do not bundle or roll up the excess part of the cords. If the connections are faulty, no sound will be heard from the speakers. Main/center/rear speakers One side of the provided speaker cord has a white broken line and the other side has no line. Connect the (+) terminals on both the speaker and the amplifier using the side with a white broken line. Connect the (–) terminals on both components using the side with no line. White broken line Red: positive (+) Black: negative (–) Subwoofer (INPUT1/OUTPUT terminals) Connect the (+) terminals on both the subwoofer and the amplifier using one side of the cord. Connect the (–) terminals on both components using the other side of the cord. Red: positive (+) Black: negative (–) How to Connect: 1 Press and hold the terminal’s tab, as shown in the figure. 2 Insert the bare wire end properly into the terminal hole. [Remove approx. 10 mm (3/8”) insulation from the speaker cord.] 10 mm 3 Release your finger from the tab to allow it to lock securely on the cord’s wire end. 4 Test the firmness of the connection by pull...