


Оценок - 0, средний балл: 0
(
 )
)
|
Фото и характеристики Olympus SP-600UZ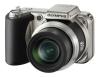 |


К этому устройству также есть другие инструкции:
Фрагмент инструкции
2Connect the TV and camera. Multi-connector . Open the connector cover in the direction of the arrow. AV cable (supplied) Connection via HDMI cable Connect to the TV video input jack (yellow) and audio input jack (white). 1On the camera, select the digital signal format that will be connected ([480p]/[720p]/[1080i]). 2Connect the TV and camera. When set to [1080i], 1080i format takes priority for HDMI output. However, if this setting does not match the input setting of the TV, the signal format is changed first to 720p and then to 480p. For details on changing the input setting of the TV, refer to the TV’s instruction manual. When the camera is connected to the computer or the like by the USB cable, do not connect the HDMI cable to the camera. Connect to the HDMI connector on the TV. HDMI micro connector HDMI cable (type D/sold separately: CB-HD1) Open the connector cover in the direction of the arrow. 3Turn on the TV, and change “INPUT” to “VIDEO (an input jack connected to the camera).” 4Turn on the camera, and use HIto select the image for playback. For details on changing the input source of the TV, refer to the TV’s instruction manual. Use an HDMI cable that matches the HDMI micro connector on the camera and the HDMI connector on the TV. When the camera and TV are connected by both an AV cable and an HDMI cable, the HDMI cable will take priority. Depending on the TV’s settings, the displayed images and information may become cropped. 44 EN For information on using the menus, see “Using the Menu” (p. 4). For information on using the menus, see “Using the Menu” (p. 4). T o operate images with the TV remote control 1 Set [HDMI CONTROL] to [ON], and turn off the camera. 2 Connect the camera and TV with an HDMI cable. “Connection via HDMI cable” (p. 44) 3 First turn on the TV, and then turn on the camera. .Operate by following the operation guide that is displayed on the TV. With some TVs, operations cannot be performed with the TV remote control even though the operation guide is displayed on the screen. If operations cannot be performed with the TV remote control, set [HDMI CONTROL] to [OFF] and operate using the camera. Saving battery power between shots [POWER SAVE] t(Settings 3) .. POWER SAVE Submenu 2 Application OFF Cancels [POWER SAVE]. When the camera is not being used for approx. 10 seconds, the ON monitor automatically turns off to save battery power. T o resume standby mode Press any button. Viewing the image immediately after shooting [REC VIEW] t(Settings 3) .. REC VIEW Submenu 2 Application OFF The image being recorded is not displayed. This allows the user to prepare for the next shot while following the subject in the monitor after shooting. ON The image being recorded is displayed. This allows the user to make a brief check of the image that was just taken. Even when set to [ON], you can resume shooting while the image is being displayed. Automatically rotating images shot with the camera in a vertical position during playback [PIC ORIENTATION] t(Settings 3) .. PIC ORIENTATION During shooting, the [y] (p. 38) setting on the playback menu is set automatically. This function may not work properly if the camera is facing up or down during shooting. Submenu 2 Application OFF Information about the vertical/ horizontal orientation of the camera during shooting is not recorded with images. Images shot with the camera in a vertical position are not rotated during playback. ON Information about the vertical/ horizontal orientation of the camera during shooting is recorded with images. Images are automatically rotated during playback. EN 45 Printing Direct printing (PictBridge*1) By connecting the camera to a PictBridgecompatible printer, you can print images directly without using a computer. To find out if your printer supports PictBridge, refer to the printer’s instruction manual. *1 PictBridge is a standard for connecting digital cameras and printers of different makers and printing out pictures directly. The printing modes, paper sizes, and other parameters that can be set with the camera vary depending on the printer that is used. For details, refer to the printer’s instruction manual. For details on the available paper types, loading paper, and installing ink cassettes, refer to the printer’s instruction manual. Printing images at the printer’s standard settings [EASY PRINT] In the [SETUP] menu, set [USB CONNECTION] to [PRINT]. “Using the Menu” (p. 4) 1 Display the image to be printed on the monitor. “Viewing images” (p. 16) 2 Turn on the printer, and then connect the printer and camera. Open the connector cover in the direction of the arrow. USB cable (supplied) Multi-connector OKCUSTOM PRINT EASYPRINT START 3 Press I to start printing. 4 To print another image, use HI to select an image, and press the Abutton. To exit printing After a selected image is displayed on the screen, disconnect the USB cable from the camera and printer. OKPRINTEXIT 46 EN Changing the printer’s settingsfor printing...