


Оценок - 4, средний балл: 3.8
(

 )
)
|
Фото и характеристики Canon PowerShot SX150 IS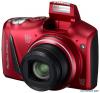 |


К этому устройству также есть другие инструкции:

Фрагмент инструкции
Sepia Lets you shoot sepia toned images. Blue Lets you shoot blue and white images. 65 Adding Effects and Shooting (Creative Filters) Shooting with Color Accent You can choose to retain a single color and change the rest to black and white in a composition. Recorded color Choose T. • Follow Steps 1 – 2 on p. 61 to choose T. Press the lbutton. • The unchanged image and the Color Accent image will alternately display. • The color for default settings is green. Specify the color. • Position the center frame so it is filled with the color you want and press the qbutton. • The specified color will be recorded. Specify the range of colors. • Press the opbuttons or turn the 5dial to change the range of colors to be retained. • Choose a negative value to limit the range of colors. Choose a positive value to extend the range of colors to similar colors. • Press the lbutton to complete the setting and restore the shooting screen. • Using the flash may cause unexpected results in this mode. • Depending on shooting conditions, the image may become coarse, or the colors may not come out as expected. 66 Adding Effects and Shooting (Creative Filters) Shooting with Color Swap You can swap one color in an image for another when recording it. You can only swap one color. Choose Y. • Follow Steps 1 – 2 on p. 61 to choose Y. Press the lbutton. • The unchanged image and the Color Swap image will alternately display. • The default setting is to change green to gray. Specify the color to be swapped. • Position the center frame so it is filled with the color you want and press the qbutton. • The specified color will be recorded. Specify the target color. • Position the center frame so it is filled with the color you want and press the rbutton. • The specified color will be recorded. 67 Adding Effects and Shooting (Creative Filters) Specify the range of colors to be swapped. • Press the opbuttons or turn the 5dial to adjust the range of colors to be swapped. • Choose a negative value to limit the range of colors. Choose a positive value to extend the range of colors to similar colors. • Press the lbutton to complete the setting and restore the shooting screen. • Using the flash may cause unexpected results in this mode. • Depending on shooting conditions, the image may become coarse, or the colors may not come out as expected. 68 Detecting a Face and Shooting (Smart Shutter) Detecting a Smile and Shooting The camera will shoot, even without pressing the shutter button, when it detects a smile. Choose . • Follow Steps 1 – 2 on p. 58 to choose , then press the l button. • Press the qrbuttons or turn the 5dial to choose , then press the l button. • The camera will enter shooting stand-by, and [Smile Detection on] will appear on the screen. Point the camera at a person. • Each time the camera detects a smile it will shoot after the lamp lights. • Press the pbutton to pause smile detection. Press the pbutton again to resume smile detection. What if a smile is not detected? Smiles are easier to detect if the subject faces the camera, and opens their mouth enough to show some teeth when smiling. Changing the number of shots After choosing in Step 1, press the opbuttons. • You should switch to another mode when you finish shooting, or the camera will continue taking shots each time the camera detects a smile. • You can also shoot by pressing the shutter button. 69 Detecting a Face and Shooting (Smart Shutter) Using the Wink Self-Timer Point the camera at a person and press the shutter button fully. The camera will shoot approximately 2 seconds after it detects a wink. Choose . • Follow Steps 1 – 2 on p. 58 to choose , then press the l button. • Press the qrbuttons or turn the 5dial to choose , then press the lbutton. Compose the shot and press the shutter button halfway. • Confirm that a green frame appears around the face of the person who will wink. Press the shutter button fully. • The camera will enter shooting stand-by, and [Wink to take picture] will appear on the screen. • The lamp will blink and the self-timer sound will play. Face the camera and wink. • The shutter will release approximately 2 seconds after a wink is detected from the person inside the frame. • To cancel shooting with the self-timer after the countdown has started, press the nbutton. What if a wink is not detected? • Wink a bit slowly. • A wink may not be detected if eyes are covered by hair or a hat, or when wearing glasses. 70 Detecting a Face and Shooting (Smart Shutter) Changing the number of shots After choosing in Step 1, press the opbuttons. • Shutting both eyes will also be detected as a wink. • If a wink is not detected, the shutter will release approximately 15 seconds later. • If there are no people in the shot when the shutter button is pressed fully, the camera will shoot after a person enters the shot and winks. Using the Face Self-Timer The shutter will release approximately 2 seconds after the camera detects a new face (p. 83). You can use this whe...