


Оценок - 5, средний балл: 3.6
(

 )
)
|
Фото и характеристики Canon PowerShot SX40 HS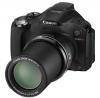 |


К этому устройству также есть другие инструкции:
Фрагмент инструкции
• Press the nbutton to stop the slideshow. • If you press the qr buttons or turn the 5 dial during playback, the image will switch. If you keep the qrbuttons pressed, you can fast-forward through images. • The power saving function (p. 48) does not work during slideshows. • You cannot change [Play Time] if [Bubble] is chosen in [Effect]. • In single image playback, you can also start a slideshow by pressing and holding the m button and immediately pressing the button. 124 Magnifying Images Approximate Location of Displayed Area Move the zoom lever toward k. • The display will zoom in on the image. If you continue to hold the zoom lever, it will zoom in up to a maximum factor of approximately 10x. • If you press the opqr buttons, you can move the location of the displayed area. • Move the zoom lever toward g to zoom out, or continue to hold it to return to single image playback. • If you turn the 5dial, you can switch images while zoomed. • In magnified display, pressing the n button restores single image playback. • Movies cannot be magnified. Viewing Each Image in a Group Grouped images taken in mode (p. 74) can also be viewed individually. Choose an image group. • Press the qr buttons or turn the 5 dial to choose an image that displays , then press the m button. View each image in the group. • If you press the qr buttons or turn the 5 dial, only the grouped images will display. • If you press the d button, [Display all images] will appear on the screen. Press the m button to exit group playback. Viewing Each Image in a Group Group playback In group playback (Step 2), you can search (p. 120) and magnify (p. 125) images. You can process all the images in a group at once while in “Protecting Images” (p. 128), “Erasing Images” (p. 132), or “Choosing Images for Printing (DPOF)” (p. 152), by choosing a set of grouped images. Ungrouping Images Grouped images taken in mode can be ungrouped and viewed individually. Choose [Group Images]. • Press the n button to choose [Group Images] in the 1 tab. Choose a setting. • Press the qrbuttons to choose [Off]. • Press the nbutton to complete the setting and restore single image playback. • Grouped images taken in mode are ungrouped and appear individually. • To regroup the images, follow the steps above to choose [On]. Grouping cannot be canceled while viewing images individually (p. 125). 126 Displaying Various Images (Smart Shuffle) The camera will choose 4 images based on the displayed image. If you choose one of those images, the camera will select 4 more images letting you enjoy playing back images in an unexpected order. This will work best if you take many shots of various scenes. Choose [Smart Shuffle]. • Press the n button to choose [Smart Shuffle] in the 1 tab, then press the m button. • Four images will appear as possibilities. Choose an image. • Press the opqr buttons to choose the image you want to view next. • The chosen image will be displayed in the center, and the next 4 possibilities will appear. • Press the m button to display the center image at full size. Press the m button again to restore the original display. • Press the nbutton to restore single image playback. • Only still images shot with this camera will play back in Smart Shuffle. • [Smart Shuffle] is not available in the following situations: -If there are less than 50 images taken with this camera on the memory card -If you play back images not supported by Smart Shuffle -During filtered playback Changing Image Transitions You can choose from 3 transition effects when switching between images in single image playback. Choose [Transition]. • Press the nbutton to choose [Transition] in the 1 tab, then press the qrbuttons to choose a transition effect. Protecting Images You can protect important images so that they cannot be accidentally erased with the camera (pp. 29, 132). Choosing a Selection Method Choose [Protect]. • Press the nbutton to choose [Protect] in the 1 tab, then press the m button. Choose a selection method. • Press the opbuttons or turn the 5 dial to choose a selection method, then press the m button. • Press the nbutton to complete the setting and restore the menu screen. If you format the memory card (pp. 23, 159), protected images will also be erased. Protected images cannot be erased with the camera’s erase function. To erase an image, cancel protection settings first. Protecting Images Choosing Images Individually Choose [Select]. • Follow Step 2 on p. 128 to choose [Select], then press the m button. Choose images. • Press the qr buttons or turn the 5 dial to choose an image, then press the m button. .. will appear on the screen. • Press the mbutton again to deselect the image. will disappear. • To choose additional images, repeat the above procedure. Protect the image. • If you press the n button, a confirmation screen will appear. • Press the qr buttons or turn the 5 dial to choose [OK], then press the m button. If you switch to Shooting mode or turn off the camera befor...