


Оценок - 4, средний балл: 4
(

 )
)
|
Фото и характеристики Canon PowerShot S100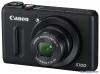 |


Фрагмент инструкции
37 Components Guide Zoom Lever Shooting: i(Telephoto) / j(Wide Angle) (pp. 25, 50) Playback: k(Magnify) / g (Index) (pp. 138, 143) Microphones (p. 30) Lens Mode Dial Shutter Button (p. 24) Mode Dial Lamp (pp. 53, 72, 73, 74, 183, 184) Power Button (p. 19) GPS Signal Receiver (p. 109) Flash (pp. 50, 81) Control Ring (p. 121) Tripod Socket Memory Card / Battery Cover (p. 17) DC Coupler Terminal Cover (p. 196) Use the mode dial to change the Shooting mode. Auto Mode You can leave it to the camera to select settings for fully automatic shooting (pp. 25, 30). Special Scene Mode You can shoot with the optimum settings for the scene (p. 60). Creative Filters Mode You can add various effects to images when shooting (p. 63). P, Tv, Av, M, C Mode Choose settings yourself to take various types of pictures (p. 80). Movie Mode For shooting movies (pp. 30, 128). Even if the mode dial is set to a position other than Movie mode, movies can be shot by pressing the movie button (p. 129). Components Guide Strap Mount (p. 13) Screen (LCD Monitor) (pp. 40, 204, 208) Indicator (see below) (Ring Function Selector) (p. 121) / Call Up Registered Functions (p. 187) / a (Single Image Erase) Button (p. 29) Movie Button (pp. 30, 127) Speaker A/V OUT (Audio/Video Output) / DIGITAL Terminal (pp. 35, 164, 192) HDMITM Terminal (p. 193) n Button (p. 43) 1 (Playback) Button (pp. 28, 137) b (Exposure Compensation) (p. 81) / d (Jump) (p. 140) / oButton e (Macro) (p. 92) / f (Manual Focus) (p. 102) / qButton Control Dial (see below) m FUNC./SET Button (p. 42) h (Flash) (pp. 50, 81, 106) / rButton l (Display) (p. 40) / pButton • Turning the control dial allows you to perform operations such as choosing items or switching images. Except for a few operations, the same operations are possible with the opqrbuttons. • The indicator will light or blink depending on the camera’s status. Color Status Operation Status Lights When connected to a computer (p. 35), display off Green Blinks During camera start-up, recording/reading/transmitting image data, or while the logger function is operating (p. 113) When the indicator blinks green, do not turn the camera off, open the memory card slot/battery cover, shake or jolt the camera. These actions may corrupt the image data or cause the camera or memory card to malfunction. 39 Screen Display Switching the Display You can change the screen display using the p button. Refer to p. 204 for details on information that appears on the screen. Shooting [ ][ ] Playback No Information Simple Information Detailed Information Focus Check Display Display Display Display (p. 146) • When you shoot, you can change what appears on the screen in [Custom Display] (p. 185). • You can also switch the display by pressing the p button while the image displays right after shooting. However, Simple Information Display is not available. You can change the display that appears first by pressing the n button, then choosing [Review Info] in the 4 tab (p. 185). Screen Display in Low Light Conditions The display automatically brightens when shooting in low light conditions, allowing you to check the composition (Night Display function). However, the brightness of the image on the screen, and the brightness of the actual image recorded may be different. Screen noise may appear and the movement of the subject may appear somewhat rough on the screen. This has no effect on the recorded image. Overexposure Warning during Playback In Detailed Information Display (see above), overexposed areas of the image flash on the screen. Screen Display Histogram during Playback High • The graph that appears in Detailed Information Display (p. 208) is called the histogram. The histogram shows the distribution of brightness in an image Low horizontally, and the amount of brightness Dark Bright vertically, and in this way you can judge the exposure. • The histogram can also be displayed while shooting (pp. 185, 204). RGB Histogram/GPS Information Display • If you press the obutton in Detailed Information Display, you can switch between displaying the RGB histogram and GPS information. • The RGB histogram shows the distribution of shades of red, blue and green in an image. The shades are shown horizontally, and the amount of each shade vertically. In this way you can judge the color of an image. • If you switch to GPS information display, you can check the location information (latitude, longitude, elevation) and shooting date recorded to still images and movies (p. 112) when [GPS] is set to [On]. The displayed contents, from top to bottom, are latitude, longitude, elevation and UTC (shooting date/time). • When a signal is not correctly received from a GPS satellite, [---] will appear in place of numerical values for items where positioning data is incomplete. • UTC stands for “Coordinated Universal Time”, and is approximately equivalent to Greenwich Mean Time. 41 FUNC. Menu – Basic Operations You can set commonly used shooting functions using the FUNC. menu. Th...