


Оценок - 2, средний балл: 4
(

 )
)
|
Фото и характеристики Canon PowerShot A40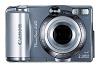 |


Фрагмент инструкции
In order to attach any of these lenses, you also need to use the optional Conversion Lens Adapter LA-DC52B. Wide Converter WC-DC52 Use this converter for taking wide-angle shots. The wide converter changes the focal length of the camera body’s lens by a factor of 0.7 (The thread diameter is 52 mm.). 148 Tele-converter TC-DC52 This 52 mm-threaded diameter magnifying conversion lens is for taking telephoto shots The lens changes the focal length of the camer s lens by a factor of 2.4x. .It is not possible to attach a lens hood or filter to the wide converter or tele-converter. .If you use the flash when shooting with the wide converter, the outer area of the recorded image (and especially the lower right corner) will come out relatively dark. .The wide converter blocks part of the view through the viewfinder. .When using the wide converter, please set the camera to maximum wide angle. .When using the tele-converter, please set the focal length to maximum telephoto. At other zoom settings, the image will appear as if its cor ners have been cut off. 149 Close-Up Lens 250D (52 mm) This lens makes it easy to take macro shots. With the camera set to Macro mode, you can use this option to shoot subjects that are 10 to 25 cm (3.9 to 9.8 in.) at maximum wide angle and 13 to 25 cm (5.1 to 9.8 in.) at maximum telephoto from the lens tip. .Please do not use the flash when shooting with this lens. Shooting Ranges in Macro Mode Distance between Lens tip and Subject At maximum telephoto At maximum wide angle 13 cm (5.1 in.) 25 cm (9.8 in.) 10 cm (3.9 in.) 25 cm (9.8 in.) Shooting Range 48 . 36 mm (1.9 . 1.4 in.) 82 . 61 mm (3.2 . 2.4 in.) 106 . 80 mm (4.2 . 3.2 in.) 230 . 173 mm (9.1 . 6.8 in.) 150 Ring Release Button Ring Conversion Lens Adapter LA-DC52B (52 mm) This optional adapter is required for attaching the wide converter, tele-converter and close-up lens (all optional). Attaching a Lens 1 Be sure that the camera is turned off. 2 Press the ring release button and hold it down, and turn the ring in the direction of the arrow. 1 2 3When the . marks on the ring and the camera are aligned, lift off the ring. 151 4 Align the . marks on the Conversion Lens Adapter and the camera, and turn the adapter in the direction of the arrows as far as the C mark on the camera. . 5 Set the lens on the adapter, and attach it securely by turning it in the indicated direction. 152 .Completely remove all dust and dirt from conversion lenses with a lens blower brush before use. The camera may focus on any dirt that remains. .Exercise due caution when handling the lenses since it is easy to dirty them with finger prints. .Be careful not to drop the camer a or adapter when removing the ring. .When shooting with these attachments , please use the LCD monitor to compose your shots. The attachments block part of the view through the viewfinder, and the area shown in the viewfinder does not match the area of the shot that is actually recorded. .You should not shoot images in mode when using these attachments. Although it is possible to select this mode at the camera, the PhotoStitch software will not be able to stitch the images together at the computer . 153 Camera Care and Maintenance When the camera becomes dirty, clean it as follows. Camera Body: Wipe the camera body with a soft cloth or eyeglass lens wiper. Lens: Clean the lens with a lens blower brush, then wipe lightly with a soft cloth. . Never wipe the camera body or lens with organic solvents or other synthetic cleaning solutions. If you are unable to remove the dirt from the lens, contact Canon Customer Support Help Desk. Viewfinder: Clean with a lens blower brush. If necessary, wipe lightly with a soft cloth or e yeglass lens wiper. LCD Monitor: Clean with a lens blower brush. If necessary, wipe lightly with a soft cloth or e yeglass lens wiper. . Don’t press strongly on the monitor or rub it forcefully. Strong pressure or rubbing may cause scratches on the surface. .Never use water, paint thinner, benzene, or detergents to clean the camera, as these may cause damage or deformation. 154 Troubleshooting Problem The camera doesn’t function (no power). Cause The camera is turned off. The battery cover or CF card slot cover is open. Batteries are loaded in the wrong direction. Batteries are depleted. Batteries are not the right type. Batteries are not making good electrical contact with the camera. Solution Press the ON/OFF button for a few moments. Be sure these covers are closed securely. Reload the batteries in the correct direction. • Replace with unused alkaline or fully recharged batteries (four AA-size batteries). • Use a household power source. Use only unused AA- size alkaline batteries or Canon AA-size NiMH batteries. (For the information about alkaline batteries, see “Proper Battery Handling” (p. 19).) Wipe the battery terminals with a clean dry cloth. 155 Problem The camera doesn’t shoot. The power is off but the lens did not retract. Cause The mode dial is set to (Replay). ...