


Оценок - 4, средний балл: 4.5
(

 )
)
|
Фото и характеристики Bose LIFESTYLE T20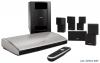 |


Фрагмент инструкции
• House code – The house code is what enables the remote control in another room to communicate with the control console. If you set up a Bose link-enabled speaker system in another room, the remote used in that room must be set to the same house code that is stored in the control console. Your system is set to house code 15 at the factory. To see the house code, select Homewide in the Setup menu and then select house code. On the screen, you will see the house code and a representation of how the second room remote control switches should be set to match the house code in the control console. Your system has two house code modes. The Standard mode provides 16 house codes and 16 room codes. If you live in a multi-unit dwelling, you can select the Alternative mode that provides 64 house codes and 4 room codes. Note: Switching between Standard and Alternative house code modes resets the house code to zero (0). • Using HDMI connections – To hear audio in another room from any device connected to HDMI input 1, 2, or 3, you must also make an analog audio connection between the device and the left (L) and right (R) analog connections for that input. Likewise, you must also make analog audio connections if a digital audio connection is made for input 4 or 5. • Radio operation – Using an expansion room remote, you can select and control the radio that is built into the control console in the main room. However, if both rooms want to listen to the radio at the same time, they can only listen to the same station. *Not applicable to systems sold in Japan. 20 TAB 8 TAB 7 TAB 6 TAB 5 TAB 4 TAB 3 TAB 2 English CARE AND MAINTENANCE Replacing the batteries Replace all four batteries when you notice a marked decrease in the range or response of your remote control, or when you see the low battery indicator (V25 and V35 systems) on the display. 1. Slide the battery compartment cover off the back of the remote control. 2. Remove the old batteries. 3. Install four new AA (IEC-LR6) 1.5V batteries, matching the polarity markings (+ and –) to the markings inside the battery compartment. 4. Slide the battery cover back into place. Cleaning You can wipe the outside surfaces using a soft dry cloth. You can also lightly vacuum the speaker grilles. • DO NOT use solvents, chemicals, or sprays. • DO NOT allow liquids to spill or objects to drop into any openings. Viewing system information Press and hold the Setup button on the control console to display the following system information on your TV: • Control console serial number, software version, and IR database • Acoustimass® module serial number and software version • Radio software version • TV connection status • Remote control ID number and software version • House code • Connected Bose® link rooms • Device connections Press the Setup button again to remove the list from the screen. The Beatles iPod 3:20 The B iP 0 Beatles CPabolde 3:2 Low battery icon (V25 and V35 systems) AA (IEC-LR6) batteries (4) Battery compartment cover 21 CARE AND MAINTENANCE English TAB 2 TAB 3 TAB 4 TAB 5 TAB 6 TAB 7 TAB 8 Troubleshooting Problem What to do The system is not responding to initial operation of my Bose® remote • Make sure the control console is turned on. • Make sure batteries are in the remote. • Reset the system. See “Resetting the system” on page 24. • Press any remote key and watch the power light on the control console. It should blink with each press. If not, see “Pairing the remote with the console” on page 24 and follow the procedure. The Bose remote does not control a device I added during the initial setup • Try setting up the device again. Press the Setup button on the control console. Select the device options and follow the on-screen instructions to set up the device again. • Your system may need a software update. See “Performing a system software update” on page 24. One video connection is less than optimum • To change a video connection, press the Setup button on the control console and select the device setup options. Follow the on-screen instructions. System doesn’t do anything • Make sure the AC power cord is inserted securely into the power supply. • Make sure the Acoustimass® module and the power supply are fully plugged into a live AC (mains) outlet. • Select a connected device from the SOURCE menu. • Reset the system. See “Resetting the system” on page 24. No sound • Make sure the Acoustimass module is plugged into a live AC (mains) outlet. • Increase the volume. • Press the Mute button ( ) and make sure your system is not muted. • Check the input connections on the control console. Make sure that you have selected the right source. • Make sure that the audio input cable is firmly plugged into the Acoustimass connector on the control console and the other end is firmly seated into the Media Center connector on the Acoustimass module. • Check connections between the front and rear speakers and the Acoustimass module. • For radio operation (V25 and V35 systems only), c...
Эта инструкция также подходит к моделям:Домашние кинотеатры - LIFESTYLE AM324446 (2.61 mb)
Домашние кинотеатры - LIFESTYLE T10 (2.61 mb)
Домашние кинотеатры - LIFESTYLE V25 (2.61 mb)
Домашние кинотеатры - LIFESTYLE V35 (2.61 mb)