


Оценок - 2, средний балл: 3.5
(


 )
)
|
Фото и характеристики Yamaha CD-S700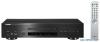 |


Фрагмент инструкции
4 Shows the file number. 5 Lights up when this unit is in disc mode (refer to page 9) and also when an Audio CD is recognized on the tray. 6 Lights up when MP3 file is played back. 7 Lights up when WMA file is played back. 4 En CONTROLS AND FUNCTIONS Remote control 1 Infrared signal transmitter (p. 6) Send infrared signals to this unit. 2 CD/USB (p. 9) Switch between disc mode and USB mode. 3 DIMMER (p. 12) Select brightness level for the front panel display. 4 Numeric buttons (p. 10) Select a track directly. 5 PROGRAM (p. 15) Turn program mode on or off. 6 / (Search backward/forward) (p. 11) Search tracks backward/forward. 7 / (Skip backward/forward) (p. 11) Skip to the next/previous track or skip back to the beginning of the current track. 8 OPEN/CLOSE (p. 9) Open or close the disc tray. 9 PURE DIRECT (p. 10) Turn PURE DIRECT mode on or off. 0 DISPLAY (p. 12) Switch the time display. A ENTER (p. 15) Confirm the track number when this unit is in program input mode. B CLEAR (p. 16) Clear programmed track. C REPEAT (p. 13) Repeat playback of a single track or all tracks. D RANDOM (p. 13) Set random-sequence play. E A/B (p. 14) Set repeat A-B. F (Pause) (p. 10) Pause playback. G (Play) (p. 9) Start playback. H (Stop) (p. 10) Stop playback. INTRODUCTION English 5 En CONTROLS AND FUNCTIONS Installing batteries in the remote control 1 Press the part and slide the battery compartment cover off. 2 Insert two supplied batteries (AA, R6, UM-3) according to the polarity markings (+ and –) on the inside of the battery compartment. 3 Slide the cover back until it snaps into place. ¦ Notes on batteries • Change both batteries when the operation range of the remote control decreases. • Use AA, R6, UM-3 batteries. • Make sure that the polarities are correct. See the illustration inside the battery compartment. • Remove the batteries if the remote control is not to be used for an extended period of time. • Do not use old batteries together with new ones. • Do not use different types of batteries (such as alkaline and manganese batteries) together. Read the packaging carefully as these different types of batteries may have the same shape and color. • If the batteries have leaked, dispose of them immediately. Avoid touching the leaked material or letting it come into contact with clothing, etc. Clean the battery compartment thoroughly before installing new batteries. • Do not throw away batteries with general house waste; dispose of them correctly in accordance with your local regulations. Using the remote control The remote control transmits a directional infrared beam. Be sure to aim the remote control directly at the remote control sensor on the front panel of this unit during operation. Within 6 m (20 ft) ¦ Handling the remote control • The area between the remote control and this unit must be clear of large obstacles. • Do not spill water or other liquids on the remote control. • Do not drop the remote control. • Do not leave or store the remote control in the following types of conditions: – high humidity, such as near a bath – high temperature, such as near a heater or a stove – extremely low temperatures – dusty places • Do not expose the remote control sensor to strong lighting, in particular, an inverter type fluorescent lamp; otherwise, the remote control may not work properly. If necessary, position the unit away from direct lighting. 6 En CONNECTIONS CONNECTIONS Connecting your amplifier CAUTION • Before making any connection, switch OFF the power to the unit, the amplifier and any other component. • Connections should be made to the correct input terminals of the amplifier or another component. • If the placement of this unit causes noise to another equipment, such as a tuner, move them further away from each other. PREPARATION RCA stereo Coaxial cable Optical cable Amplifier cable (supplied) • The digital output is turned off when this unit is in PURE DIRECT mode. To connect this unit to your amplifier, choose one of the ways listed below. When the ANALOG OUT terminals of this unit are used ( ) Connect these terminals to the CD (or AUX) terminals of the amplifier by using a supplied RCA stereo cable. For details concerning these connections, refer to the operation instructions of the amplifier being used. • Be sure that the left (L) and right (R) of these terminals are connected to the corresponding (left and right) terminals of the amplifier or other component. When the DIGITAL OUT (OPTICAL) terminal of this unit is used ( ) Connect this terminal to the optical input terminal of an amplifier with a commercially available optical cable. • Use a reliable optical cable. When the DIGITAL OUT (COAXIAL) terminal of this unit is used ( ) Connect this terminal to the digital input terminal of an amplifier with a commercially available coaxial cable. English 7 En CONNECTIONS Connecting the supplied power cable Asia and General models only Europe and U.K. models To the wall outlet with the supplied power cable ¦ VOLTAG...